Let's Build a DollhousePage 9Building the Stairs |
|
 |
It is up to you whether or not you want to make your own staircase or purchase it ready made. There are lots of dollhouse suppliers who sell stairs.Here are instrutions if you want to make your own How to Make the Stairs Building the stairs is not as complicated as one might imagine. It took me a week to make these dollhouse stairs, but 99% of that time was spent waiting for the glue to dry. I am not a fan of fast drying glue, it always seems to dry too fast for me. It is really important when making the stairs, to give the glue time to dry before you begin the next step. I usually wait overnight.
|
Here are all the pieces for the stairs Here are all the stair parts. Stained and ready to use. If you are going to stain the stairs it should be done now, before you start to use any glue. If you get any glue on raw wood , it will not take the stain. You will notice I have not yet included stair spindles. We will do those later. From the left The tiny pieces that go on the hand rail,the handrail/banister, the steps and the newel post, the stair treads, the bottom step, the stringers, the base [ I dont know what that white blob is, my poor photography :- )] |
The stairs are made using a triangular molding for the steps. I had to settle for 3/4 cove molding. You begin by cutting the cove molding into 2 3/4 pieces, and then place these pieces, pointy side up on a piece of wood, like this.
For the base, you may have to buy 3 balsa and then cut the base, 2 3/4 x 14 use the steel ruler and knife. You can actually use strong cardboard if you like.
|
Materials for the Stairs 38 ½ of 3/4 triangular molding or cove molding for the steps 42 of 7/8wide x 1/16 thick bass wood for the stair treads 14 of 2 3/4 wide x 1/8 thick balsa, for the base of the stair 30 of 1x 1/8bass wood for the 2 stringers [these go down either side of the stairs] 31/2 of 3/8x 3/8 bass wood for the newel post 14 of 1/4x 1/4 bass wood for the handrail/ banister 28 of 1/16 x 1/16bass wood to go down each side of the handrail 42 of 1/8 x 1/8 bass wood for the spindles 3'' of 3/8'' x3/8'' bass wood for newel post
|
DIRECTIONS 1. For the base, you may have to buy 3 balsa and then cut the base, 2 3/4 x 14 use the steel ruler and knife. You can actually use strong cardboard for this, it wont be seen. I like to think my dollhouse will be around for a long time so I use balsa wood. 2. Make the steps, cut the cove molding into 14 2 3/4 lengths. Use the mini saw and miter box to do this. It is important to make sure these are all exactly the same size. 3. Make the stair treads, cut the 7/8 wide bass wood into 14 2 3/4 lengths *NOTE. I cant stress enough how important it is to get the steps and treads exactly the same length. If you have to throw a few out to achieve this, its worth it. You can use sandpaper on them if you are just a tiny bit off. Glue the stair treads to the steps 4. Make the stringers, cut the 1 wide bass wood into 2 15 pieces
[they will end up at 14 but 15gives u some lee way Cut one end of each at a 45-degree angle, use your miter box and mini saw for this. The angle cut will sit on the floor. 5. I like the look of the bottom step being a bit wider than the rest. If you want to do this, you can make that little extra piece now . Cut a piece of the 7/8 bass wood about 3 1/4 long and shape the end with your knife and sandpaper into a rounded shape.
|
The Newel Post My first try at carving a newel post using a knife, and I couldnt
get the grooves in same place on all sides, so I found an easier way
carve the newel post. Just keep going until you have all the cuts where you want them on
the newel post. When all the saw cuts are done, carve and shape the
grooves however you want them I use sandpaper to shape the handrail
and round it on the top. |
The newel post |
Assembling the Stairs This is where patience is a virtue. We have to give that glue time to dry. I will divide the directions to one day at a time. |
|
Day 1 Glue all the steps that you cut from the triangular or cove molding onto the 2 3/4''x 14'' base, see photo 1 |
photo 1 |
Day 2
|
photo 3
|
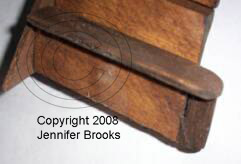
Day 3 Glue some cove molding, or anything with a 90-degree angle on the underside of the base, right at the edge this will not show, it is to reinforce and help to hold the outside stringer. Wait for the glue to dry. See photo 4 |
photo 4 |
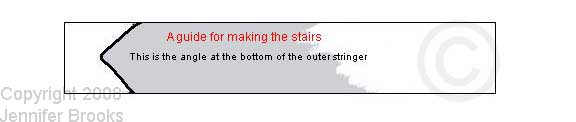
Day 4 We need to glue on the outside stringer. The angles get a bit tricky
where the stringer meets the bottom step so I have made a printable
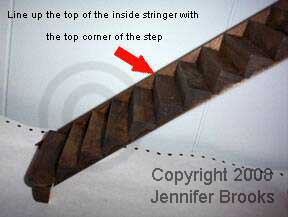
template of it. Glue the outside stringer to the stairs. This time line up the top of the stringer with the bottom corners of the steps. Make sure to put glue on those reinforcements. Hold the stringer tightly in place with masking tape or saran wrap. Wait for the glue to dry. |
photo 5 stringer |
 |
|
Day 5 Glue the newel post onto the bottom step. Place it just a fraction in from the end of the second step. Remember all of the spindles have to line up with the newel post. Make sure you have the newel post glued on at an exact 90-degree angle. Wait for the glue to dry See Photo 5 Glue on 14 piece of 1/16x1/16 down the bottom of the railing, right at the edge. Cut one end of the railing at a 45-degree angle, so that it will sit against the newel post. See Photo 6 Think carefully before you cut and use the photo as a guide. Don't glue it there yet.
|
photo 5 newel post
|
Day 6. I used 1/8 x1/8 balsa for the stair spindles. You can buy nice
spindles at dollhouse supply stores if you like.I wanted white spindles, so I painted the 1/8'' X1/8'' balsa wood first,
and then cut 14 lengths at 2 5/8 each Almost finished now, this next part is a bit fiddley-diddley.Glue the railing to the newel post and to the top of the spindles. Gently push the spindles and railing together, so that the spindles are glued to the piece of 1/16x1/16balsa wood and to the underside of the railing. I have never found an easy way to clamp this, I confess to holding it with both hands for about 30 minutes. |
The stairs are almost finished. That is not |
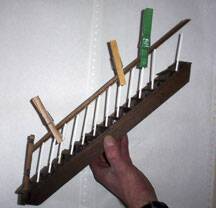
Day 7 Glue in the rest of the spindles and add the other
piece of 1/16x1/16 balsa to the underside of the railing. Use clothes
pins for clamps.
|
The finished stairs. The cost for the stairs was just under $20. This doesn't include the cost of stain. |


BUILD A DOLLHOUSE LINKS |
||||
| Links | ||
|---|---|---|
| Free Dollhouse Printables |
Tutorials | Dollhouses and Miniature projects. |
| Free Printable Dollhouse Wallpaper | How to make sofas andchairs from cardboard and fabric | This link will take you to Jennifer's[my] dollhouse. |
| Dollhouse Grocery Printables |
How to make dollhouse curtains from paper |
See my
hand-sculpted miniature dolls |
| How to make a realistic Ascot boiler | Visit my five miniature shops | |
| Printable Dollhouse Gift Bags and Boxes |
How to make a stained glass window from stickers and markers | Carole's first doll's house |
| Let's Build a Dollhouse Links | Links to dollhouse building suppliers | Carole's second doll's house |
Terms of use You agree not to use instructions and the images on this website for any commercial purpose, sale, resale, or compilation. |
||